Intro
I helped someone recently who was having trouble finding stylized post processing effects that work on the High Definition Render pipeline in Unity3D.
They were looking for an effect close to the Poster Edges filter from Photoshop Artistic Filters.
It seemed simple enough to me, so I said I’d help them out since I’d been meaning to dive more into the HDRP anyway.
After smashing together an outline edge and a posterize effect into one post processing effect, we noticed that the effect didn’t look too good on distant objects.
Easy enough right? Since you can get a 0 to 1 value of distance from the camera from the depth buffer.
I won’t go into it too much, but it wasn’t as easy to find in HDRP as say the Post Processing Stack V2.
Here I am then to save you the trouble of digging through the included HDRP post effects to find out how to actually use the depth buffer. As of right now, there wasn’t any working solutions I found through searching the HDRP documentation or through Unity Answers and forums.
Let’s get going!
Doing this in Unity
If you have dealt with post processing in Unity before, this will be familiar to you but things have been renamed, moved around, etc for HDRP.
If you have not, post processing shaders run on a single face mesh that has been placed in front of the camera. The texture coordinates of the face are transformed to screen space so that we can sample the previously rendered frame as a texture. This way we can change the colors, move the texture coordinates around, or most other shader-y things to render to the next frame.
Still Confused?
Why not check out these lovely tutorials on dealing with Depth Textures in previous versions of Unity?
Team Dogpit’s Depth-Based Post Effects1
Ronja Tutorials Postprocessing with the Depth Texture2
Although this article focusses on demonstrating how to use the depth texture in HDRP, the code is bare bones enough to show the basic structure of a HDRP post processing effect as well.
The Shader
Now here is the shader followed by some comments highlighting the important parts.
Shader "Hidden/Shader/DepthExample"
{
    SubShader
    {
        Pass
        {
            Name "DepthExample"

            ZWrite Off
            ZTest Always
            Blend Off
            Cull Off

            HLSLPROGRAM
            #pragma fragment CustomPostProcess
            #pragma vertex Vert

            #pragma target 4.5
            #pragma only_renderers d3d11 playstation xboxone vulkan metal switch

            #include "Packages/com.unity.render-pipelines.core/ShaderLibrary/Common.hlsl"
            #include "Packages/com.unity.render-pipelines.high-definition/Runtime/ShaderLibrary/ShaderVariables.hlsl"
            #include "Packages/com.unity.render-pipelines.high-definition/Runtime/Material/NormalBuffer.hlsl"

            struct Attributes
            {
                uint vertexID : SV_VertexID;
                UNITY_VERTEX_INPUT_INSTANCE_ID
            };

            struct Varyings
            {
                float4 positionCS : SV_POSITION;
                float2 texcoord   : TEXCOORD0;
                UNITY_VERTEX_OUTPUT_STEREO
            };

            Varyings Vert(Attributes input)
            {
                Varyings output;

                UNITY_SETUP_INSTANCE_ID(input);
                UNITY_INITIALIZE_VERTEX_OUTPUT_STEREO(output);

                output.positionCS = GetFullScreenTriangleVertexPosition(input.vertexID);
                output.texcoord = GetFullScreenTriangleTexCoord(input.vertexID);
                return output;
            }

            // List of properties to control your post process effect
            float4 _Params;
            #define _Distance _Params.w
            TEXTURE2D_X(_InputTexture);
            TEXTURE2D(_DepthTexture);

            float4 CustomPostProcess(Varyings input) : SV_Target
            {
                UNITY_SETUP_STEREO_EYE_INDEX_POST_VERTEX(input);

                uint2 positionSS = input.texcoord * _ScreenSize.xy;

                float3 inColor = LOAD_TEXTURE2D_X(_InputTexture, positionSS).xyz;

                // Depth
                float depth = LoadCameraDepth(positionSS);
                float linearEyeDepth = LinearEyeDepth(depth, _ZBufferParams);
                float coc = saturate(_Distance / linearEyeDepth);

                return coc;
            }

            ENDHLSL
        }
    }

    Fallback Off
}
First thing to notice is that the CGPROGRAM from previous versions of Unity is now only HLSLPROGRAM in the new render pipelines.
The library shader files to #include has changed also for HDRP. There is no UnityCG.cginc in HDRP post processing.
The Vert() function is where the vertex position and texture coordinates are converted to screen space using
the functions GetFullScreenTriangleVertexPosition() and GetFullScreenTriangleTexCoord() from the HDRP library shader files.
TEXTURE2D_X() is used to handle textures and texture samplers. _InputTexture stores the previous frame.
_DepthTexture, of course, stores the depth of each fragment from the camera.
In CustomPostProcess(), we can unpack the camera depth at the current pixel using LoadCameraDepth() then linearize the
outputted depth using LinearEyeDepth().
I invert the linearEyeDepth and scale it by a _Distance to allow me to control where the “focus” of the range of depth values
is relative to the camera.
The C# Script
With this shader, we also need a C# script to allow us to use the effect in a HDRP post processing volume.
using UnityEngine;
using UnityEngine.Rendering;
using UnityEngine.Rendering.HighDefinition;
using System;

[Serializable, VolumeComponentMenu("Post-processing/Custom/DepthExample")]
public sealed class DepthExample : CustomPostProcessVolumeComponent, IPostProcessComponent
{
    public ClampedFloatParameter depthDistance = new ClampedFloatParameter(1f, 0f, 32f);

    Material m_Material;

    public bool IsActive() => m_Material != null;

    public override CustomPostProcessInjectionPoint injectionPoint => CustomPostProcessInjectionPoint.AfterPostProcess;

    public override void Setup()
    {
        if (Shader.Find("Hidden/Shader/DepthExample") != null)
            m_Material = new Material(Shader.Find("Hidden/Shader/DepthExample"));
    }

    public override void Render(CommandBuffer cmd, HDCamera camera, RTHandle source, RTHandle destination)
    {
        if (m_Material == null)
            return;

        // Packing multiple float paramters into one float4 uniform
        Vector4 parameters = new Vector4(depthDistance.value, depthDistance.value, depthDistance.value, depthDistance.value);
        m_Material.SetVector("_Params", parameters);

        m_Material.SetTexture("_InputTexture", source);

        HDUtils.DrawFullScreen(cmd, m_Material, destination);
    }

    public override void Cleanup() => CoreUtils.Destroy(m_Material);
}
What you see is what you get here.
The script creates a material out of the shader we made, and passes uniform parameters to the GPU.
One thing to remember, you need to add your custom post processing script to a list in Custom Post Process Orders in the HDRP Project Settings.
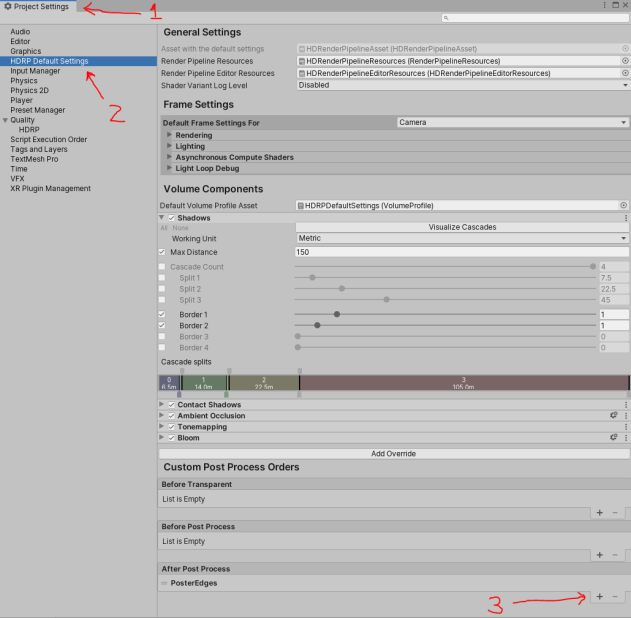
Additionally, make sure your shader is stored in a Resources folder in your assets.
Outro
Thank you for reading!
If you have any questions, do ask! Find me at @MitchJMcClellan
Hope this saves you some time. Catch you next time.