Hello everyone!
This breakdown is on an entry I did for a challenge on @HarryAlisavakis’s Technically Speaking discord.
The theme of the challenge was Retro.
I chose to do a screen transition effect from the Pokemon series, like in the video below! (Beware of the flashing images at the beginning)
A battle transition from Pokemon Green (?)
For this effect, I’ve lowered the resolution of the image and used a mask to accomplish the wipe transition.
Read on for a break down of each part of the shader followed by the full shader itself!
Rotate the UV coordinates as the mouse moves across the screen for the mask texture
Here’s a pretty practical example of Linear Algebra in use. I use a function here rotate2d() to compose a rotation matrix. Check out this excerpt from Wikipedia.
a rotation matrix is a matrix that is used to perform a rotation in Euclidean space. For example, using the convention below, the matrix
rotates points in the xy-plane counterclockwise through an angle θ with respect to the x axis about the origin of a two-dimensional Cartesian coordinate system.
Making a rotation matrix this way, I can rotate a 2D vector, the UV coordinates, by multiplying the vector by the 2x2 rotation matrix.
The angle I rotate by is scaled by the x position of the mouse to sync it to the interactive transition of the effect.
You might notice or wonder why I add 0.5 to the rotated UV’s. I do this to center the rotation to the middle of the image, instead of rotating around (0, 0).
Lower resolution by rounding UV coordinates
For me to explain this the easiest, I’ll work through an example of what the x component of the UV’s go through at this step, say at 0.47.
Say our number of _Columns of the resolution we’re targeting is 64.
We get which column we’re currently in from UV space by multiplying or UV x-coordinate 0.47 by 64 to get 32.08.
We’ll round that number to the nearest column with our round() function by adding 0.5 and flooring the result which is floor(32.08) = 32.
Next we normalize the rounded column back to UV space by dividing by our number of _Columns to get 0.5.
In the end, we’ve rounded our value of 0.47 to 0.5.
Many UV coordinates map to the same rounded UV coordinate return the same color giving us the illusion of a lower resolution!
Lower color precision
Here’s a fun part. What if we took the idea from lower resolution section and did it with the color?
The same concept can apply because it’s all just numbers anyway. So instead of multiple UV coordinates being rounded to the same pixels, we take the original colors and map them to a new palette with less colors programmatically.
Cutoff output values by grayscale mask value
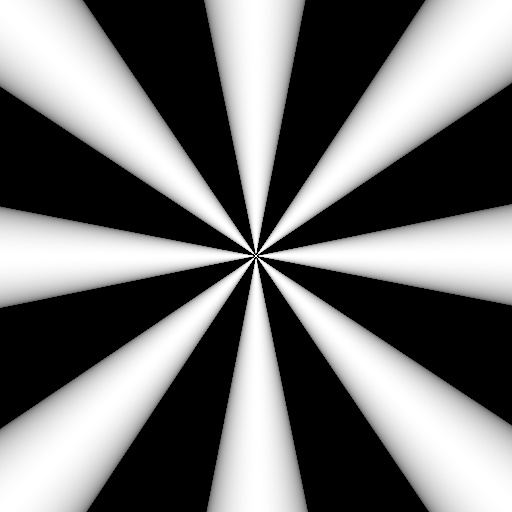
Here’s the mask texture I used for the transition itself.
I use this to give me a mask value from 0.0 to 1.0 that will determine which parts of the image turn to black as the mouse moves across the image.
I compare the x value to the mask value which shows the original image for white areas of the mask and black for black parts of the mask.
As x gets bigger as it moves across the screen, it becomes greater than the mask’s lighter values and more and more of the image turns to black.
I use the rotated UV coordinates from earlier on this image to make mask twirl as it transitions to black.
The Shader Itself
#define PI 3.14159265359

uniform vec2 u_resolution;
uniform float u_time;
uniform float u_progress;
uniform vec2 u_mouse;

uniform sampler2D u_tex0;
uniform sampler2D u_tex1;

float _Columns = 96.0;
float _Rows = 96.0;
float _ColorDepth = 8.0;

float round(float a)
{
    return floor(a + 0.5);
}

mat2 rotate2d(float angle)
{
    return mat2(cos(angle),-sin(angle),sin(angle),cos(angle));
}

void main()
{
    // Normalized pixel coordinates (from 0 to 1)
    vec2 uv = gl_FragCoord.xy / u_resolution.xy;
    float x = u_mouse.x / u_resolution.x;

    // Lower resolution by rounding UV coordinates to nearest multiple of _Columns x _Rows
    uv.x *= _Columns;
    uv.y *= _Rows;
    uv.x = round(uv.x);
    uv.y = round(uv.y);
    uv.x /= _Columns;
    uv.y /= _Rows;

    vec2 uv_rotated = uv;
    uv_rotated -= .5;
    uv_rotated.y /= u_resolution.x / u_resolution.y;
    uv_rotated *= rotate2d(x * PI / 2.0);
    uv_rotated.y *= u_resolution.x / u_resolution.y;
    uv_rotated += .5;

    // Sample black and white texture to determine which areas are transitioned first
    vec4 mask = texture2D(u_tex1, uv_rotated );

    // Sample the video
    vec4 col = texture2D(u_tex0, uv);

    // Lower color precision
    col = floor(col * _ColorDepth) / _ColorDepth;

    // Cutoff output values by grayscale mask value
    if (x <= 0.0)
        gl_FragColor = col;
    else if (x < mask.g - 0.1)
        gl_FragColor = col;
    else
        gl_FragColor = vec4(0.0);
}
Outro
Thank you for reading!
Want some further reading (watching) on this same transition? Checkout this video from the Makin’ Stuff Look Good YouTube channel!
If you have any questions, do ask! Find me at @MitchJMcClellan
Catch you next time.